by Marty | Jul 1, 2013 | General Pearls of Wisdom
Just wanted to offer my condolences regarding the passing of a true SEO heavyweight – tedster (Warren “Ted” Ulle) passed away last week, with family nearby.
I am not a frequent flyer over at webmasterworld any more, and never crept from the shadows when I was in there, but there were certainly times throughout my years doing this where I was referencing something in there, or comparing my ideas to the ones shared in places like that. Tedster’s opinions were always the kind of comments you would pay a little extra attention to – not that you had to agree with him, but simply that the man obviously knew what he was commenting on, and had insights worth sharing.
It is obvious by the outpouring of messages continuing to flow into the announcement on WMW that this was an unexpected, and awful thing for the SEO community, and the world in general.
I personally, did not know tedster, but that is simply because I never reached out to him directly, from what I see. Every message there referring to him, comments on the time, the patience and the guidance he willingly offered to those in need – always. It was how he was seen, because it was how he behaved.
Again, though my personal experiences did not include any time with tedster directly, I definitely paid attention to his comments, and listened to what he had to say. I do know what the SEO community is losing with his passing, and offer my condolences to his family and many many friends…cheers, tedster: thank you.
by Marty | May 24, 2013 | Freelance SEO Copywriting Tips
 In many ways, SEO copywriting is much like any old kind of copywriting. It is nuanced by more strategy perhaps, but in a lot of ways, you need it to work the same way you need any page to work for you. This creates some constants that will be in play no matter what happens to the algorithm, or what critter is next unleashed from the GoogleZoo.
The following are five things I find will make most any SEO copywriting effort more successful:
- Titles: Titles have SEO value, and really, so much more. Making them lopsided toward a search engine means you miss out on the one thing most people will read…and if you catch their attention, you win. Tickle ’em, kiss ’em, call ’em out on something – but use your title to pull in the reader as much as a search engine, and it will tend to do both for you anyway. Weaker pages might rely more on the power of a well crafted title, so write better pages and allow yourself the creative latitude to engage. Take full advantage of the fact you can have a page title, then an H1 – Google will use either as they see fit, based on the query. Strategy here is feather light and requires balance but this is a balance crucial to your success.
- Synonyms, and related themes: One of the main problems in SEO copywriting gone wrong, is hammering keywords to death. Maybe if you draft it like that, fine – but come back during the editing, and swap out some synonyms, and blend in related ideas. The semantic abilities of search engines to connect meaning, no matter how hamfisted they may be describing what meaning is, is still improving every year. So they don’t need you to repeat one word 30 or 40 times to understand the connection: baby’s all grown up. Spread your vocabulary’s wings and delve a bit deeper than the surface ideas of an idea.
- Bullets and lists: There are two good reasons to use lists/bullets: 1) breaks up the text, making it scan-able (the eyes can breathe for a minute) 2)pulls out details so the reader can skip thru it. Readers love bullets and lists and always will. As a copywriter, proper use of lists and bullets is a skill you develop and definitely improve on over time. You learn how to make them more effective simply in the way you present them and how you determine to use them. The skills for good bullets aren’t hard to learn – consider it simplifying concepts, consistently. Note how the bullets in this list are all going to be about the same length – that is an example of an intentional writing strategy for lists.
- Subheads: Subheadings are a lot like bullets, in the way they give the reader pause. They can be used to dramatic effect or as a great way to shift gears in the way you are writing. Say you want to move from one topic to the next, and a subheading is going to be the easiest, and generally the best way to do it. I tend to use them, knowing a lot of readers want to only look at these and only scan the rest of my babbling. If you have targeted keywords (kind of the point in SEO copywriting), subheads are a great places for variations or synonyms to be used. H2, H3, H4 tags and so on might have slightly more value than body text, and synonyms and variants increase your conceptual reach.
- Fire in the belly: Passion is really hard to fake. But the good thing is a passionate voice is forgiven misspellings, grammatical errors, vernacular and slang use and all kinds of things we’ve been well-trained to not do. A fire in the belly allows you to create messages that make people care: they love you, hate you, support and fight you. But when you take a stand it is hard for a reader to not react from their own guts – maybe guts have some kind of telepathic quality that is fired up by a well written page. Who knows. But engagement does not happen because you padded or even researched keywords and it is not established by your word count. It happens when you connect to a readers needs, and answer. This point should have been first, because all others pale when compared.
So there you go – it doesn’t matter what Google wants to do, these 5 things are still likely to work for you, because they did long before Google was in there calling the shots.
Tips and tricks to stay in the search engines are the very same things that get you in trouble eventually. SEO copywriting is not about the latest and greatest loopholes to exploit, it is about creating content that works today and (hopefully) tomorrow because it is not answering the needs of an always fussy and petulant algorithm; instead, it speaks to higher things in better ways…answering the needs of READERS.
Same old song, I know, but always worth repeating. 😉
by Marty | May 13, 2013 | Stuff for Foodies
No – this does not mean I am more than a fan of farting. Although they are usually funny.
Eons ago, I used to do electrical work. In a bathroom, the exhaust fan is referred to as a “fart fan” by sparkies because of its obvious purpose. Every bathroom has them (or should).
I had one in my house that was making some weird noises (sounded like a burned out bearing) so yesterday, I replaced it.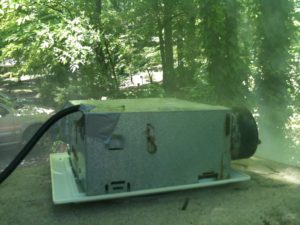 However, I did not throw the old one out – I cleaned it out and fixed it, and figured out a great use for it.
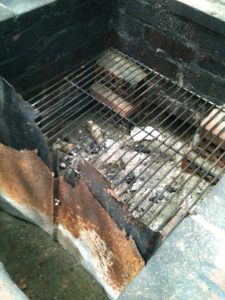
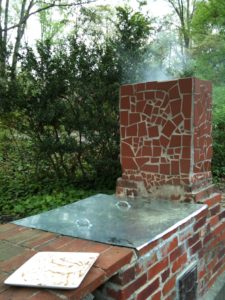
The Beast
The Beast is a great BBQ despite how ugly she is, but it does have some air-flow inconsistencies, especially after I added some new stuff inside it. I would always address this previously by dropping flaming paper down the chimney – it would usually pull  the air back up and thru that way. Once primed right, it would cruise. But I might need to do that once an hour or so – which was a big pain, and it made it hard to gauge the cooking time which became kind of inconsistent.
So I cut the cord off an old saw that was otherwise useless, and hardwired it into the old fart fan, so it has a plug. I ran an extension cord (which my wife hates me for), and put that fan on top of the chimney and fired it up – the result, was incredible air flow control…it worked perfectly. I have 2 picnic shoulder cuts on there right now, easing their way into delicious over the course of this afternoon….but this new way to control the air in there is going to make it much easier for me to master, and get exactly where I want it to be.
Or so I think – we’ll see what the pork shoulders come out like. Chopped pork is on the menu tonight, so I have a lot riding on it.
Probably more faith than anyone has ever put into a fart fan before.
…later
OK – it is the next day, and I couldn’t have been more pleased with the way that thing worked.
I had intended to only use it occasionally, to recreate the natural draw. But once it started going, I decided to simply let it go, and see what happened.
The steady draw was great for the fire, and great for the meat. It created enough draw to pull the top down tighter – so pulling it up when it was cooking was actually effort – that has never been before. But I loved it – the fan was like a car exhaust or industrial smokestack, just steady. Smelled better than a paper mill though! Here’s a minute or two video clip of it working.
I was able to leave it alone the whole time, and simply stirred coals, and added more hickory to them a couple times.
I cooked it like that for 4 hours – bringing internal temps in the shoulders to 165-170.
I took ’em off, wrapped them in foil and put them in the microwave, to rest – usually, I use a little cooler for that, but was too lazy to go to the basement to get it.
After about 30 minutes of letting them sit in their own juices, I carved them up.
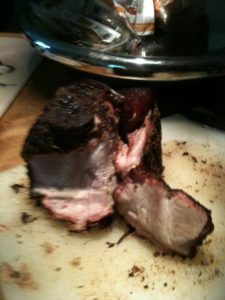
Shoulders aren’t as good for BBQ as butts, in that they are simply tougher, more fatty…and these were kind of cheap, as far as that goes.
But the flavor was PHENOMENAL – check out that smoke ring, it goes in almost a half inch in places. The marrow in the bones was delicious too – but only I ate that, while I was messing with carving it.
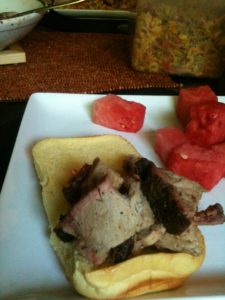
I chopped it all up, put it in a big bowl and made a vinegary BBQ sauce for it (on the side, of course). Had these little soft potato rolls, so it was heavenly. My friend Lee should be drooling right about now, wishing they had BBQ like this in Prague.
 By the end of it all, the fart fan was a champ and a half – made it super easy to use the Beast more efficiently. I am the fart fan’s biggest fan.
Here’s what it looked like, after 4 hours of work…it smells wonderful, despite how it looks. I may have to do a different top for it – this was more of a trial run, just to see what it could do. This was easy though, and I can always clean the top, if I cared. A brand new fart fan is $16, so at least I have a plan that has been tested well. I will say though, if yours ever looks like this one does when it is still in your bathroom, you may have some bigger problems to face. 🙂
by Marty | Apr 16, 2013 | Stuff for Foodies
Oh, the spring is a wonderful thing. Despite the gag-inducing pollen in Atlanta, warm weather means more cooking outside – so I decided to fix the Beast.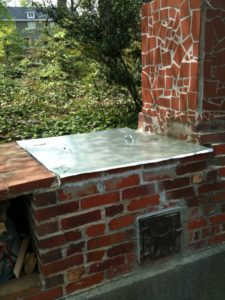
In 2002, I was determined to make a brick BBQ because we had some bricks laying around. And lots of trees – oaks and hickorys, all there for the proper using in a wood burning BBQ. I didn’t know anything about making a BBQ but did it anyway – I am never one to let things like that stop me.
The Beast was a true champ for years – but in time, my ill-conceived design started to show some age, and it got to a point where I did not use her so often, because it was becoming a lot of effort. Then it fell into more disrepair, and I did not even think about using her for well over a year. I honestly couldn’t use her safely or effectively – she was down for the count it seemed.
But this year, I wanted her back – so I spent Easter weekend cleaning her out, mixing concrete, and repairing her. She’s an ugly old bird anyway – I simply wanted her to work as she once did, which was perfectly.
 Long story short, I made a new top and even put handles in it – then I smashed down the edges of the new top with a brick, so it fits this thing exclusively. I reattached the fire door, which is handy when it is operating. I also concreted bricks inside, both to hold the grill and to prop the new metal wall I added.
This was a new thing for the Beast: I built an interior wall, so I could do more indirect cooking. The Beast has always had a lovely air flow, so I wanted to see if I could maximize it, and wall off the heat entirely…it had always worked best as a semi-indirect source. I cut one of the old top pieces and bolted it together, and it bowed in perfectly as I saw it in my head. (It is those jagged pieces you see to the left.)
The idea was, build a big fire, and then use the metal wall to pull it all to one side, away from the meat.
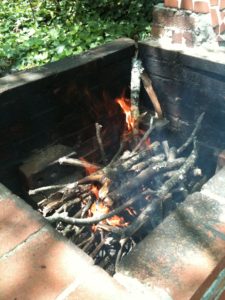
So I went into the yard and pulled up some big hickory branches, busting them into proper size. It had been a while, so there was plenty of stuff to find…I filled a wheelbarrow in a couple minutes.
Took me no time to get it blazing – and I kept feeding it for a while, making it big and hot.
Once I had the fire going good, I tried to use the metal wall to slide it all over to one side. What I did not consider, was just how hot it would become in there, and how moving it around was like reaching into Satan’s colon.
Oops.
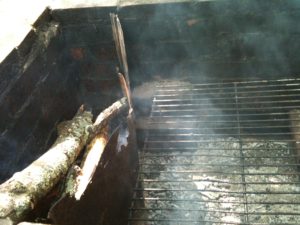 But I used a big metal bar I had, and got the majority of it where I needed it to be…then forced the wall in there to hold it all. That worked really well actually – but actually moving the fire and coals, not so much.
I got them all in place though, and put more fresh wood on it to keep it going a long time. There was very little fire/coals left on the side where I put the grill back in.
Rubbed Down Ribs
 So for her inaugural rebirth run, I wanted to make ribs, one of my favorite BBQ specialties. I had some old ribs in the freezer, so thawed them out – had 6 racks of baby backs. Made a dry rub and while I built the fire, I had them sitting in it.
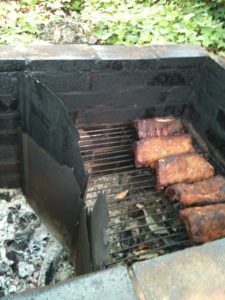
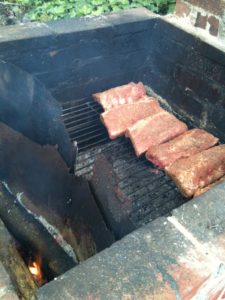 I wanted to see what the Beast could do on her own merits, especially indirectly, so I simply put the ribs on the grill, away from the fire/coals.
 Now the way she always worked in the past, once you got a good flow going thru the chimney, it always held. But the wall inside, and maybe the bricks I concreted in there to hold the grill, were changing the flow, and it was not so consistent.
When it works well it works well – and smoke billows steadily thru the chimney. But the wall was making the smoke stop in the cooking chamber, opposed to flowing out – so I had to prime the chimney multiple times by lighting a piece of paper, and dropping it down.
But it cooked all afternoon, and I left the ribs where I put them on the grill, only tending the fire and air flow.
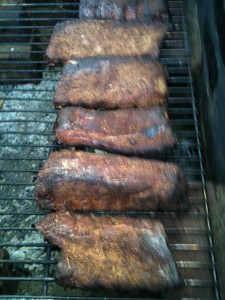 After about 3 hours, they were done – and the heat was NEVER direct on them. I could’ve had this a lot hotter, actually – so maybe next time, I blend in some wood-based charcoal or something.
Still, the rub was great, and the ribs were fabulous.
 I cut them all individually (they don’t shrink so much if you cook them like this), and noted a decent smoke ring.
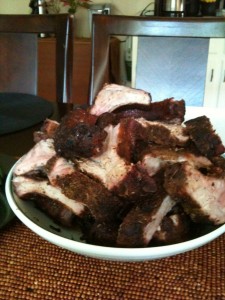
I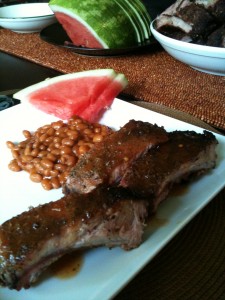 don’t always sauce my ribs – sometimes I do, but sometimes I do like to make and serve them dry.
I made a Carolina BBQ sauce for these, which is very vinegary and watery – but it was PERFECT for the ribs…they needed it, but you didn’t know until you tried it.
I served it with only thinly sliced watermelon and beans – but no one complained. 🙂
So the Beast is back – and though I need to figure out how to maximize that air flow again, in the meantime, I will enjoy feeding my wife and friends ribs, briskets, turkeys and whatever else I decide needs to be slow cooked this summer!

by Marty | Apr 9, 2013 | Stuff for Foodies
Ok – this one is both for my son Zach, and my mom – who both asked about this recipe. Zach is being a huge PIA about it, because the last one I made for him he devoured, so I guess he wants to impress his friends and make one at Auburn…so let’s get on with it.
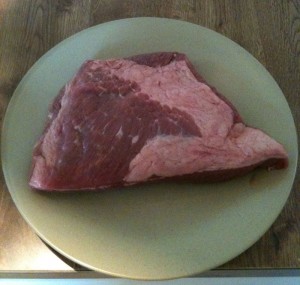 Beef Brisket is one of the easiest things to make – which rules, because it is delicious.
Ideally, you want to cook a brisket with indirect heat for a long time – I use The Beast (my homemade brick BBQ) and oak/hickory when I can, and they come out truly stellar. But sometimes I am stuck inside, so have to use the oven so this recipe is based on oven cooking. If you can manage indirect heat and smoke, that is WAAAY better – but that is not always so easy to accomplish.
But you can see, a brisket is cut leaving a big layer of fat on one side of it – that little bit of meat crawling over the left here in the pic, is not always there – most times, you see only the white fat there. Unlike other types of meats, you want to leave this fat on there – no need to trim it away…it becomes part of your delicious.
This one is about 2 1/2 pounds – typical for this cut. You can get bigger ones – just be clear on your cooking times, and make sure you block out enough time to do it.
The key in a brisket, is cooking it long and slow – letting that fat melt down into the meat, flavoring and tenderizing it wonderfully. So like many long cooked meats, this one is best served by applying a nice dry rub of spices on it to bring out the flavors and character you are after here.
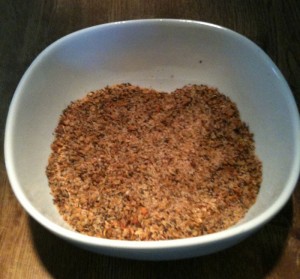
 So the rub I like to use, is based on garlic, onion, salt/pepper, and a little hot stuff. You can make one out of whatever you like (and Zach, the one you want used all of the pictured spices plus some thyme). How heavy you go with any of these, or what kind of blend you create is really the signature of the thing here – because this is all there is to a brisket.
Whatever you choose to blend for your spices, mix them in a bowl so they are well blended.
 Now I do have to say, I mixed more than I needed for this one – and should have probably simply taken some of that extra, and saved it for something else – but instead, I used it all.
Once the blend is achieved, rub it into the meat – and I mean rub it in there good. You want there to be no more raw meat or fat showing anywhere – it all needs your spicy goodness.
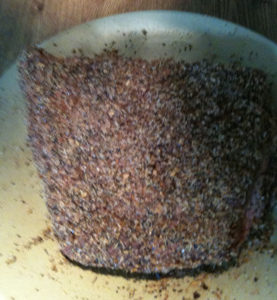 On the right over here, I have the brisket all rubbed down – you can see how thick I went with it. Do you have to go this far? No – but you do want to cover it well, because a brisket on its own is not the most flavorful thing in the world. And going a little heavy is not usually a problem because you cut it into thin strips – so a lot of seasoning on a little part helps to carry it thru.
But once you have the meat seasoned well, you are almost done with this thing – the hard part is really getting the proper blend of your spices.
The only thing you need to do now, and it is REALLY important – is to make sure the fat side is up – not down. You want that fat to melt, and drip thru your brisket – so having it fat-side up means you are ready to go.
Cooking Your Brisket
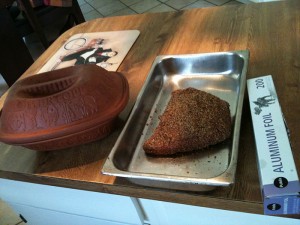 Now, my preferred way to cook a brisket (and a lot of other things) indoors, is using my Romertopf clay cooker. It is over there on the left – and like the name implies, is a clay cooker that treats anything inside it really nicely. But Zach doesn’t have one at Auburn, so I decided I would do this is a simple metal roasting pan.
 If you are unlucky enough to NOT have a clay cooker yet (eediots!), all you need is a pan big enough to hold it, and some tinfoil to wrap it up tight. Make a good seal around the edges – you are essentially creating a covered dish.
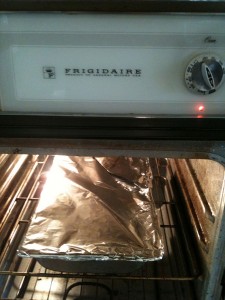
But I don’t even pre-heat the oven for these – I simply put it in there at 275° and let it go.
And yes – I did say 275° – because a low heat is needed to cook it long, and slow. Give it about an hour and a half per pound at that temp. I simply put it in the oven, set my timer, and walk away.
NEVER open the door, or check on it – it is fine, and you don’t want the heat to escape. You don’t baste it, you don’t have to do anything except leave it alone.
Because the one I had was 2 1/2 pounds, I did it for just over 3 hours – at about 280° – because I was timing it for a specific dinner hour. I could’ve gone another hour on it, and it would not have hurt it a bit. But low heat, long time. You go now.
Finishing the Brisket
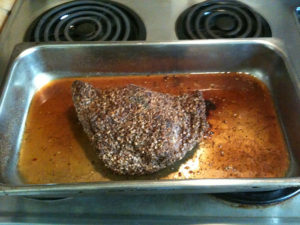 OK – after all that time, I take off the tinfoil, and I have what is actually a pretty dry piece of meat, and some lovely au jus.
I let it rest for about 10 minutes, then I take the meat to a cutting board, and pour off that au jus into a bowl, and put a ladle in it – I like it just as it is. You could easily make it into a killer gravy by heating it up and adding a roux, but the jus on its own is super flavorful, and perfect as it is.
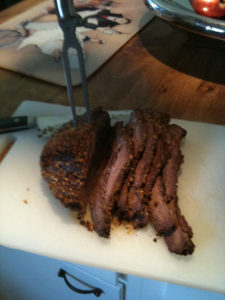 The last thing (before devouring it) is slicing it – go across the grain, and cut it into thin strips. If there is any fat left from the thick strip after cooking, it will be a thin, seasoned layer – and it is truly wondrous.
That’s it though – slice it thin, serve it with the au jus, and tell ’em Marty sent you. 🙂


