by Marty | Feb 14, 2013 | Stuff for Foodies
 aaah, pot roast. That all-in-one comfort food, so perfectly balanced with everything we want – so tender and lovely, melting away on the fork, slipping into the gravy like a sultry little temptress, falling apart on the tenderized potatoes and carrots swimming nearby.
I am a fan anyway, so years ago, I had my mother-in-law show me what she did to make hers so good (they are always excellent, Shirley!), and kind of messed around with it for a while to come up with a recipe that always works.
What I am going to offer here, is more for my son and his friends/roomies at college – a nice way to prepare a big (5+ pounds) pot roast for you and the fellas…a family style meal, that allows you to build it, leave it for most of the run, and then come back to eat it later with everyone – not be fixing sauces or shit when it is go time.
So if you are like my son and his pals at college this year, you don’t have a lot of room or anything to play with beyond a fridge, and an oven.
You’ll need:
- A pan to sear (brown) the roast – a frying pan big enough to hold it. If the roast is too big for your frying pans, you might use a larger baking dish on the stovetop to get thru the browning part.
- An oven
- A roasting pan that allows for the roast, as well as the veggies (note: you can buy a tinfoil one at any large grocery store, and pitch it when you are done if you need to) – it has to fit in the oven too, if you have a small oven.
Ingredients:
- The Roast – assuming you have a big one, like 5-7 pounds or something like that
- Seasoning (this is a dry rub, so it is whatever you want it to be – I’ll give you some ideas below)
- Flour (enough to thoroughly dust the roast, probably a cup or so)
- Olive oil (just a little bit)
- Veggies – limited to what you want, but standard issue would be onions (probably 2-3 vidalias or sweet onions, cut into bite size pieces), carrots (cut) or baby carrots, mushrooms and potatoes (like yukon gold, or red, or any kind of little potato you want – if you use large ones, you’ll need to cut them first, and they will mush up on you – so using small, whole potatoes of whatever type is better. I try to use as many as I can here – a bag full anyway.)
Rubbing Your Meat
OK – as a BBQ guy, I like the use of dry rubs on meats that I cook for long times – I think they bring out flavors, and add depth to otherwise simple cuts, and a roast is a great example of bland, weak meat that benefits from what you can bring into it thru a balanced rub.
So what you blend to create your rub, is up to you and becomes a bit of a personal thing – but mix-up some dry spices in a bowl to coat the roast. If you need help making one up, use garlic powder, onion powder, salt, pepper, cayenne, rosemary, thyme, marjoram, and maybe some cracked red pepper or other extras and you’re gonna have a beauty. You can go with other things like allspice and cumin to add different tones and flavors to it – but the base seasoning to bring out some of the characteristics you want if you are after that old familiar taste, should be garlic, onion, salt and pepper. That gives it the “classic” taste with flavors you’ll remember.
Be generous with the rub – the meat will be covered with more stuff and cooked a long time, so don’t skimp.
I use the little bowl, rather than sprinkling the ingredients directly on the meat – this allows me to mix and balance it before I apply it, and it allows me to season every bit of the surface – I use my hands, and work it in there.
For some fun things to try with the rubs, look at blending brown sugar with hot, spicy seasonings – there are gazillions of ways to go there.

In the picture over here to the left, you can see I have the Kosher salt and the pepper mill there.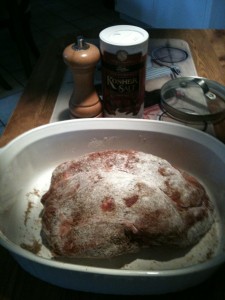
If you are not using kosher salt, chances are good that the salt you use kind of disappears into whatever you are cooking. This may be what you want, but for me, I want to find the salt in there – I don’t want to absorb it, I want to taste it. And by taste, I am not suggesting being overwhelmed by too much of it – simply the little edge you get from kosher salt, staying in there a little longer comparatively. Same goes for the pepper – the difference in crunching the peppercorns or using the dry stuff is night and day, as far as flavor goes.
In the case of the classic pot roast, we are looking for salt and pepper tastes – so I suggest going with kosher or sea salt, and crushed peppercorns. For this one, I added these spices AFTER I rubbed it with other stuff.
Once the meat is properly seasoned, you are going to dust it with flour so you can brown it, as seen to the right, above. Maybe now, turn on the oven to bake at 350, so it will be ready for you.
Brown the Meat
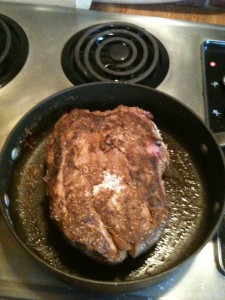 After you have the roast properly seasoned and floured, you want to sear it in a hot pan with a little oil in it. What this will do is create a nice little crust on the outside, plus, it helps to seal in the juices as it cooks.
Heat a skillet big enough to hold the roast, and put olive oil in – enough to coat the bottom. 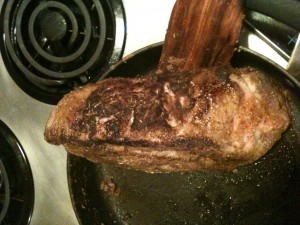 Let it get really hot – you don’t want to put the meat in too soon, and have the pan heat up with the meat in it, that’ll totally mess up your browning. But just a couple minutes per side – and if you can manage it without making a mess, searing the edges is a nice touch.
Over on the right there, you can see I am doing just that. I think it helps to seal it all up, like a big flavor football for you.
 Once the meat is browned on every surface as you want (and edges are an option, not necessity) transfer it to the roasting pan. I usually have a bed of onions, waiting there.
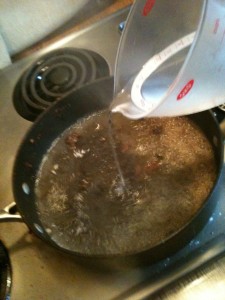
Then you want to quickly deglaze the searing pan, so all that flavor that seared into it can be part of your meal.
Keeping the empty frying pan on the med-high heat you had it for searing, pour in a about a cup and a half of water, slowly.
You’ll see it turn colors, and pull all the seared bits off the pan – this is what you want. Stir it a couple times, to get everything off the pan, then just pour it over the roast in the roast pan.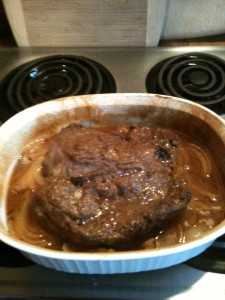
This water will become your gravy, and will tenderize the roast as it cooks.
Usually, I will hit the roast with a couple shots of Worcestershire sauce, then cover the whole thing with tinfoil. Then you’re good to go – you want to cook the meat on its own for a good hour or two, then add the veggies later. On the right, is what it looked like after I cooked it for 90 minutes at 350. You may need to add a little more water – depends on how well you seal the tinfoil and how much cooks up/off.
Cooking, and Finishing the Pot Roast
The actual cooking time you need, depends on the size of the roast. Anything over 2 pounds I like to give at least 3 hours to – extra time tenderizes. But at 300 degrees or so, an hour per pound is about right. The veggies should be added about an hour before you want to eat…assuming you are over 300 degrees.
Think of it like BBQ, in that a large hunk of meat likes to cook long and slow, at a lower heat. So if you do the initial hour at 350, you could do the long stretch at maybe 250-300, and add more time. If given a choice, always opt for lower heat, longer time for a good roast. Make sure you have enough water in it too, to be cooked into it…if you cook that off too fast, the roast can get really dry.
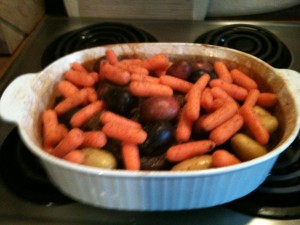
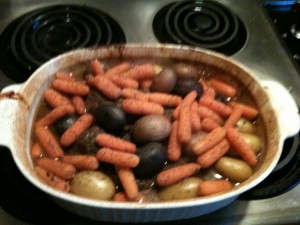 This one took just under 3 hours – I did 90 minutes with the roast alone, then close to that again with the veggies. I added a little dill, and salt and pepper to the veggies. It was at about 300-350 the whole time. I kept it covered it in tinfoil while cooking too, to help retain juices.
But the cool thing with this, is once it goes in the oven, other than adding the veggies it is hands-free. It may take a couple hours, but it is worth it, and you can play XBox or study while it cooks. Study! It’ll make the house smell fantastic while it cooks.
One thing you can do, is pre-prep: brown the meat and cook it for an hour then wrap it, and wait to finish it until you want to eat it. You could prep the meat in the morning, come home for lunch and throw it in the oven (probably lower than 350, depending on your timing), come home from classes and add the veggies to finish it, cooking it at 350 for an hour. A crock pot opens other options too.
The Key: Not Everything at Once
The key to your classic pot roast, is to not add everything at one time, up front. That may be easier, but it will turn the veggies into mush after a couple hours.
Instead, if you season, sear, and roast the meat and then add your veggies to finish it, everything has and holds onto more of a character you can appreciate. Don’t make something that is easy, something stupid because you want to cut corners. It does take a little time and care to brown the meat and time it all out right, but the results will have you licking your plates. And it is really easy, no matter how it seems after all this talk about it.
I guess to finish this Auburn style, there has to be some beer involved, but I am not going to support that kind of behavior. War Damn Eagle!
by Marty | Feb 24, 2012 | Stuff for Foodies

OK, the Holidays have officially passed. I dragged the old tree down into the woods a few weeks ago, and put all the decorations back into storage. Now that the parties are all said and done and us merry revelers are forced back into our sterile routines, it is finally safe for me to bestow upon you the best egg nog recipe, ever.
I would not do it during the holidays to ensure my own gatherings were memorable – indeed, people have come to understand my egg nog is not like others, and is worth enduring my prattling on. Every time I make it, people ask for the recipe, or an IV – usually both. They pledge to listen to me, if only long enough to latch onto the ‘nog tit. I get it.
I decided after so many requests again this year, to finally give the recipe away. If you like egg nog, this recipe is going to make you cry with unbridled joy, or pray, or orgasm, or do whatever you do when mouth awesomeness overtakes you. It is boozeless, but go ahead and spike yours as you see fit. Captain Morgan’s Spiced Rum or brandy are both good I hear.
I give a solid nod to my Mom – it was her recipe I read, and stole/appropriated to create this one. My Mom’s egg nog in the 70s was crazy perfect, and a granite memory of mine. She would fill milk jugs, and we kept them in the snowbanks outside the back door. I dialed back a little of the sugar and some of the control and precise measures hers had, but otherwise, this is all Mom’s recipe. Definitely came from me trying to recreate that unmatched deliciousness.
———————————————————————–
Ingredients for The Best Homemade Egg Nog Ever:
- One dozen eggs (yep – all of ’em)
- One half-gallon to a gallon of milk (skim, 2%, or whatever)
- I pint heavy whipping cream
- sugar- white refined or powdered – 1 half cup, and one quarter cup, separated.
- a good shot of vanilla extract, 2-3 times (eyeball it, but don’t go crazy)
———————————————-
 Step One:
separate egg whites and yolks. Put yolks aside.
Sounds so easy – almost care-free and fun. Separating eggs is pretty hateful though, at least to me – this is by far the hardest part of making this, but absolutely required.
Suck it up.


Step Two:
add quarter cup sugar and small shot of vanilla (optional) to egg whites – beat until they are stiff peaks – a meringue is what we want here. Set meringue aside.
(Note: I have used Cream of Tartar in this before to help stiffen the meringue, but did not see a change really when I didn’t have it, so I don’t normally use it. Go ahead if you have some – because how many times do you ever get to use it? Cream of Tartar soup?)

Step Three:
mix together the heavy whipping cream, a good solid shot of vanilla extract, and a half cup of sugar. When it’s creamy and smooth, stop…especially before it becomes too thick and turns buttery. You are looking for whipped cream that is very soft and silky.
Step Four:
In a separate mixing bowl, hand-whisk egg yolks with a medium-to-smaller shot of vanilla extract. Slowly add milk (the full gallon or half does not need to be used – you can use less, and the nog is richer…but about half should be fine and the rest is to taste). Whisk milk with yolks for consistency…looking for simply a nice blending of all ingredients. Light froth is OK, but settle down.

Step Five:
Combine the meringue and the heavy cream in the serving punch bowl, then fold-in the yolk and milk mixture, stirring constantly. Pull the meringue and cream into the yolk-milk mixture, blending all. Even after generously mixing, it will settle and produce a very light/whipped froth on top, and the nog will be below.
Garnish the frothy top of this drink with ground nutmeg and cinnamon…I tend to be a little generous. Better if you can shave nutmeg onto it, but hey.
———————————————
It seems like this would be super rich with all those ingredients, but it is really light and airy. The meringue is the key – it really makes this stuff have an amazing texture.
I have made this with hand mixers, and now a couple times with a KitchenAid big mixer (my Precious is lovingly in those images above) – and there is no comparison to how long it takes – the KitchenAid is so key in the process, I am even willing to make it more often now.
So there you go – I imagine less people may be coming by this Holiday season if they see the recipe posted here…thank God no one reads this. But if they all stay at home, inducing their own egg nog comas – I totally understand. 🙂
by Marty | Nov 27, 2011 | Stuff for Foodies
 This year, I decided I wanted a little more of a traditional turkey kind of Thanksgiving meal. You see, I have been creating meals for this lovely holiday for years and often try to throw a few curve balls in there, just to keep it lively. I might make duck, or ham, or ostrich or something other than turkey – but sometimes, a good old fashioned treatment is all that is needed…or wanted.
And there was at least one thing I had never done to a turkey before that I kept seeing mentioned, and that was brining it. Brine was an alien thing to me until I read up on it a little, and then it made perfect sense – so I made my family the guinea pigs this year as I brined my first bird.
What is Brine?
Brine is a solution where there is a lot of salt. Kind of like salt water/stock on steroids. The salt-to-stock content is over 50 parts per thousand, so this is a thickly salty solution.
Why Make Brine?
They used to used brine to preserve food, but we have better ways to do that today. Brine is used today primarily to enhance flavors and cooking or pickling techniques. Making your own gives you control over flavors more than anything else, in my opinion. If you make it, you can depend on how it behaves (or should). And the magic words: it is easy.
For me, I wanted a way to keep my bird moist through cooking for a long time in the oven, while infusing a little flavor. The things I read about brining made me think it was a smarter way to prep a large bird. I have basted many of them in the past with great success – they truly look like champs, but the meat is often very dry. I saw brine as a way to get deeper to the meat in preparation for a long day spent in the oven.
My Approach to Brining the Turkey
Once I decided on brine, I had to learn how to do it. Essentially, you make a saltwater boil – dissolving a lot of salt into the fluid. I am sure there are measurements somewhere, but I eyeballed it, and just dumped most of a new shaker full of Kosher salt into a pot of boiling stock – (I used beef, vegetable and chicken stock…mostly vegetable). A shaker here means something similar to a shaker of Parmesan cheese size…about a cup an a half to every gallon of stock. Just remember this brine needs to be more than 50 parts salt per every thousand.
The salt is what permeates the skin and opens up the flavor options. So I added a bunch of stuff to my brine to kick it up, like a quartered apple, a bunch of allspice berries and some star of anise, some cayenne pepper, honey, brown sugar, black and pink peppercorns, and other “darker” flavors. Chucked in a half bottle of Napa Valley red, just to be fair. I was going for a specific taste, so built on the allspice swirl with cinnamon sticks and coarsely ground nutmeg. I knew most of this nuance is lost in the process, but figured what the hell. 🙂
I brought the brine to a boil, then simmered it for about a half hour to mix it all and blend really well. I kept adding stuff too – like a kid and his chemistry set. It smelled like a warm winter’s drink. I cursed my lack of ginger root…but it still came together. Looked like spiced soup.
I killed the heat and brought it down to room temp. Once at room temp, I put the whole pot in the freezer for a little while, to create a chill for it.
When it was chilled, it was done.
The Ice Bath
One point of brining that I learned was you need to do it very cold to avoid bacteria. This is why I needed to put the brine in the freezer to chill it, and this is why I needed to complete the process with an ice bath.
I took my thawed turkey, removed the neck and giblets, rinsed and dried it, and put it in a new Tupperware 10 gallon storage thing I bought at the store. I poured on my chilled brine. I then took all of the ice from the freezer, and added about 2-3 gallons of water, to make the turkey float. I said goodnight, set an alarm for 5 hours and left it in the garage overnight like this.

Ice cubes all over my 18 pound turkey
The ice bath was a key to letting me simply drop it and go, too. I liked the idea that the meat would be fine, that bugs and bacteria were both repulsed by the cold and that it stayed easy.
I did have to buy a new Tupperware thingy to hold this, but that was a small price to pay for the technique being clean and simple.
You can’t tell by the picture, but the turkey was floating here – just enough fluid to keep it off the sides and bottom. The ratio of water to brine was about 70/30 in favor of the brine. I did have more salt, just in case – but I figured the kosher stuff I added to the brine would be fine.
I flipped this bird in its icy brine bath about halfway through – 5 hours in. I added a little more ice, and some salt…just handfuls of each.
After I woke-up on turkey day, I went down, removed it from the brine, patted it dry, and put it in the refrigerator. It had been there about 12-13 hours – it was an 18-pound bird.
Keys for Cooking a Turkey: First, Don’t Stuff It
I learned that stuffing a turkey slows down the cooking time as well as introducing the potential for salmonella. So instead of looking at the turkey’s empty cavity as a dutch oven to cram full of stuff (which I usually did), I used it for the space in creating aromatic/taste infusions. I cut a bunch of fresh herbs from my garden (sage, rosemary, thyme, tarragon, etc.) and layered them with sliced apples and oranges, leaving most of it open (it was a big bird). A little more than halfway with the layers.

Sliced apples, oranges, and fresh herbs
Next, Don’t Prolong It
The other thing that I now see as a mistake I made for years, was to cook the turkey too long. By extending the time in the oven, the potential to dry out the meat increases greatly. So my older way of doing this, might be to put the turkey in there on a relatively low heat (350-375F), opening the oven every 30 minutes to baste. But what I did not realize, was this constant opening the door, and the loss of heat simply made everything take longer.
To fix this, and still get a nice crispy skin, I again kept it simple. I rubbed it down with some extra virgin olive oil. I made a little tinfoil cover for the breasts, knowing they would need it to keep from burning – and I set it aside (easier when the turkey is still cold). I set the oven for 500F and once it hit temp, I popped it in.
After 30 minutes, I dropped the heat to 350F (my oven cooks hot), put the tinfoil on it, and let it go. It still took me about 41/2 hours to cook it off from there – but that was considerably less time than it would take for a bird this size, if I did not start out really hot like that, I believe. No basting either – I allowed the heat and the olive oil to take care of that for me.

Yep - it was as good as it looks. 🙂
So I was pretty pleased with this – I waited for the little pop-up thing to go up, and I checked internal temps to make sure it was at least 160F. I let it rest and made a traditional gravy – in the roasting pan, using a simple butter and flour roux. When I carved it up, I had the pleasure of finding it to be moist and perfectly cooked throughout -the brine left subtle flavors, but was more of a way to keep the texture and consistency stable while the bird cooked.
There were only six of us there to eat on the thing, so it is now 3 days later, and I am still eating it for every meal. We killed the white meat today – but thru it all, the brine was a champ – even on reheats, this turkey did NOT dry out at all – not even a little bit. I got my traditional bird flavors and textures, and learned more about a cool way to prep big pieces of meat.
I will be trying this with things other than turkeys – so watch out world. Listen for that dinner bell, and bring your appetites!
 aaah, pot roast. That all-in-one comfort food, so perfectly balanced with everything we want – so tender and lovely, melting away on the fork, slipping into the gravy like a sultry little temptress, falling apart on the tenderized potatoes and carrots swimming nearby.


 After you have the roast properly seasoned and floured, you want to sear it in a hot pan with a little oil in it. What this will do is create a nice little crust on the outside, plus, it helps to seal in the juices as it cooks.
 Let it get really hot – you don’t want to put the meat in too soon, and have the pan heat up with the meat in it, that’ll totally mess up your browning. But just a couple minutes per side – and if you can manage it without making a mess, searing the edges is a nice touch.
 Once the meat is browned on every surface as you want (and edges are an option, not necessity) transfer it to the roasting pan. I usually have a bed of onions, waiting there.
 This one took just under 3 hours – I did 90 minutes with the roast alone, then close to that again with the veggies. I added a little dill, and salt and pepper to the veggies. It was at about 300-350 the whole time. I kept it covered it in tinfoil while cooking too, to help retain juices.