Leftover Brisket Chili

Leftover Brisket Chili

I am spoiled. My son LOVES to BBQ, and he does it very well now. He has a large pellet grill, and thinks nothing of doing overnight cooks that last for 15 or more hours. The results are delicious, and plentiful. I often go for dinner, and come home with pounds of perfectly cooked leftovers – pulled pork, ribs, and my favorite: beef brisket. He’s a great chef and generous, so I totally win.

I was getting brisket often enough from him that I started thinking of new ways to enjoy it. One thing I have made a couple times now that I truly love, is beef brisket chili. It is easy, relatively quick, and it is absolutely amazing. I decided to do a recipe using about a dozen simple ingredients. It came out really well, so here we go.

Starting Point: Great Beef Brisket Leftovers

beef brisketIt kind of goes without saying, but you need some really solidly cooked brisket to start. My son did this one for 16 hours, then wrapped it in butcher paper and rested it in a cooler for 3 hours. It was crazy good. He had a pretty spicy bark on it, so I knew it would be perfect for chili. We devoured a bunch of it, but he cooked a really large one so there was a ton of it leftover.

I had about 2 pounds of it so decided to do the chili. I would think you could do it with a pound, but much less than that, and you might not have enough meat to do it well. I don’t measure anything, so I really don’t know what the weight was – it was enough for me, about a meatloaf’s worth. If I have less than a pound, it gets devoured as a sandwich typically, or as breakfast hash.

I grabbed a few things at the store, and was prepped in minutes. You can be pretty liberal with the ingredients…nothing is too necessary, and you can ratio things the way you like it. Some folks like a soupier kind of chili, I like it a little thicker.  But I vary the type of tomatoes, and I just spice it with whatever I have on hand. None of this is in stone, is the point – have fun, and make it your own however you want to. I find chili hard to leftover brisketmess up, if you keep it simple. I found if you balance your meat, beans, tomatoes, and fresh veggies you will do wonderfully. Cumin and chili powder will make it taste like chili for you.

I love the way leftover brisket works here, because the bark is spicy and carries the flavors for me – I go very light on any added spice for brisket chili, because I really want to taste the brisket again. If I was making more of a standard chili, I would be adding heavier spice levels for sure…the brisket is meant to be the star, here.

The full ingredient list I used for this brisket chili:

  • Leftover brisket – I think it was about 2 pounds here, but go with whatever you got.
  • Large can of red kidney beans  – I try to kind of evenly ratio the beans to the meat, but go with whatever you like. You can substitute a couple small cans of chili beans, black, white or pintos will still work. It’s your call.
  • Large can of crushed tomatoes – I used crushed ones w/basil, but plain ones are fine…as are chopped, or even whole ones (peeled). Crushed ones tend to cook the fastest, whole ones need time to break down, chunked are in the middle.
  • I fresh tomato – I add this, just because I like the chunky fresh tomatoes in it, but it is a personal thing. This is not a necessary ingredient, I just like to add one, especially in a chunkier-styled chili.
  • 2 bell peppers – I typically use chili peppers or jalepenos too, but didn’t have them this time. Adding hotter peppers is a fine idea, and I typically do so. I wanted to taste the bells – scale this to your personal taste.
  • 1 onion – I cut the onion a little smaller so it melts more into the chili as it cooks…again, personal preference dictates.
  • Dry spices to taste: Garlic Powder, Onion Powder, Salt, Pepper, Chili Powder, Cayenne Pepper, Cumin
  • Healthy squirts of sriracha (optional, for heat)
  • Cornstarch or tomato paste to thicken (I used cornstarch and water here, but typically use paste)


ingredients for brisket chili
brisket chili spices

Step One: Sautee Onions and Peppers

I had a full white/sweet onion and 2 bell peppers here, a red and a green one. I was cooking everything in my Ninja Foodi, but you could do this on the stove, too. In the Foodi I don’t need any oil to do a little sauteing like this, but use a little butter or oil to keep things from sticking too much.  All I was looking to do here was get these things softened a little.

I do a kind of rough chop, aiming all pieces of this chili to be about a half inch or so, or bigger. A little larger is fine for this kind of chili – the veggies will always reduce a bit, but keeping the chop at that size will leave them for the chew, which is my goal. If you cut them too small, they might cook down TOO much, and you’d lose the chew, which is sad. That being said, if you’d prefer to only have the flavor and use smaller bits of anything, chop away. If you dice something, it’ll melt into the chili pretty completely. 

peppers and onions for chili

Step Two: Chop the Brisket

While I was sauteing the onions and peppers, I did a rough chop on the brisket to get it all prepped up. The end pieces were about an inch, because I knew that they would kind of retain some of that shape…but I knew how tender it was, so it was going to be great. There was some good fat in the slices, and I left all the bark on it, to serve as the chili spice.

Step Three: Open, Dump the Cans & Mix

The next step is easy-just open the cans of tomatoes and beans. I drained the beans, then dumped everything in the Foodi. I chopped the fresh tomato in one-inch pieces so it wouldn’t totally cook down.

I added the chopped meat, and stirred everything together as it started to cook.

I added the spices here too – but nothing major. I was really only trying to offset the tin can taste that you get from canned tomatoes because the meat had plenty going on. I did kind of liberally squirt in a bunch of sriracha, because it has a low/slow heat that works exceptionally well in chili…but not everyone likes heat. I do, and that is how I built it here. It worked like a charm, too! Chili spices are pretty forgiving, and it is hard to make something that doesn’t work. If you need measures, use 11/2 tablespoons of each (garlic/onion powder, cumin, chili powder) with Salt and pepper and cayenne only to taste (teaspoon or 2 of each). Be gentle with the salt as there’s a lot coming from the brisket. 

brisket chili cooking

Step Four: Cover and Cook

That’s all the heavy lifting: from here, I just covered it, and slow cooked it for a few hours.

It doesn’t take long to cook this since the meat is all precooked, but I wouldn’t do less than an hour to make sure everything blends together properly. I let it go longer because I had the time, and knew it would make it better to go low and slow. I think I did this one for about 3 hours or maybe a little more, using the Foodi as a slow cooker. If you are doing it on the stove, go low and slow, stirring it every so often to keep it from sticking. An hour is enough to get rid of the tin can taste that tomatoes can hold, but give yourself some time to let it all merge. It’ll keep getting better, believe me.

cornstarch

Step Five: Thicken It

So there’re two easy ways to thicken chili: either using a cornstarch slurry, or using tomato paste. Usually I will add tomato paste, as I like having another flavor layer in there. A single, little can would have been fine here. This batch had plenty of tomatoes going on, so I opted for the cornstarch slurry instead. It was my choice, but either works.

What I do with the cornstarch, is mix a big heaping tablespoon of it in a glass of water…about 6 ounces or so, like a little highball/cocktail glass full. Stir it until there are no lumps, then just stir the milky-looking water into the chili. Use it all.

I did this about 15 minutes before I ate – if it were the paste instead, I would let it work for the last hour. If I was only cooking it an hour or so, I would add the paste with everything else…a slurry, however, can go in right at the very end and it’s fine. It needs a few minutes.

That was my last step with this one though – it was thick, and smelled absolutely like heaven. I was ready to put it in a bowl, and devour it.


Top It, and Dig In!

To top this, I used shredded sharp cheddar and some sour cream. It was a great choice, because the dairy offset the heat I developed in the chili. The sriracha did a GREAT job of building a subtle heat that rose as I ate it…it was like a slow-released, or measured effect in some way; it worked very well. The toppings cooled it all off, and the brisket flavor really came through as I wanted. There was a little fat in the chili, and the meat chunks were fall-apart perfect – I really appreciated both the texture and the flavor here. 

I hope you are as lucky as I am, and have a child or someone who cooks for you, and creates something worth savoring. This brisket chili is a hit, every time I make it, which, thanks to my son’s generosity and talent on the grill, is becoming quite often. Mmmmmmm!!!

leftover brisket chili
How to Make a Pork Butt: My Pulled Pork Recipe

How to Make a Pork Butt: My Pulled Pork Recipe

Mmmmmm – pulled pork. This is one of my favorite things to cook and eat, and I have been doing them for a couple decades now. I can’t say I perfected it, but I can say I do them better than most people, because I have learned a few things using trial-and-error, as well as talking about the process with LOTS of BBQ folks.

What we will look at here, is how I prepared 32 pounds of pulled pork for my 40th high school reunion. I am happy to say it came out as well as any I have ever done, and way better than most of them. I was happy with this result, and heard a lot of nice things from my friends. I think it was meant to be, because of who I was cooking for this time. So let’s get into it!

{Click any image below to zoom in}

Picking the Meat

The first thing to do is to select the right cut of pork to cook. You want to get a Boston Butt, or shoulder cut with the bone in. I generally find them at Publix at about 6 pounds…these butts were bought by my classmate Sherry at Sam’s Warehouse, and each was about 10 1/2 pounds(!!). They’ll have a decent amount of marbled fat, with one fat layer thick and usually very easy to see (it was true with these). Sometimes, there is a little meat on the fat layer, but more on that later.

I will give Sherry a lot of credit too – she picked some beautiful cuts of meat. I didn’t even have to tell her what to get – she knew perfectly! 32 pounds was a little intimidating, but I had volunteered. Doing one butt or 3 didn’t affect much in the way I was doing it – just more of it to do. The main thing I was worried about was whether or not all 3 would fit on the grill…so it was the first thing I checked when I brought these to my parents’ house. It was VERY tight, but I could do it, so game on!

pork-butts
coals and oak

The Cooking Medium

I am pretty lucky, in that I have had some truly great BBQs thru the years. I have had a Big Green Egg for over a decade now, and it was what I was going to use here. I knew that I needed to cook for at least 10 hours and probably wouldn’t be able to add more coal – at least not easily. Though I was in Fort Myers, Florida, I was at my parents’ house, and had previously brought down red oak and hickory logs I hand-split in my Georgia yard. It’s wonderful BBQ wood, they work brilliantly together, and I had a pile of it to use here. 

I often cook with only wood because I can, but if I need to go over 8 hours I tend to use charcoal too – I found you can control it better over time. For this one, I put the hardwood logs around the outside then filled the grill with hardwood charcoal. This is a lot of burn-ready fuel – and the Egg cooks super efficiently…I just knew from experience the Egg would burn slowly from the center, out, and 10 hours or more would need a lot of stuff to burn. It was a ton, but I knew if I didn’t burn it all it wouldn’t matter…and I’d likely burn it all in 10 hours.

The key to making pulled pork (and lots of BBQ), is your ability to maintain LOW AND SLOW. A gas grill wouldn’t work as well, but I have done it on gas or in an oven, using soaked chips that cook/smoke.  I use an Egg when I can, because it is simply the most efficient unit for slow cooking with burnable fuel. I have smoked fish at a super low 125F that I could maintain for hours in the Egg…it took a special rig, but I was able to smoke fish at that super low heat.

Pork butts, you want to cook at a steady 225F or so – and the challenge is to maintain that low heat for hours, steadily. The Egg is a terrific way to do it – I have a brick BBQ I made that is WAY harder to control. I have done it before using a temporary grill made out of cinder blocks with a wire grating (we made a couple dozen butts for a festival), but the point, always, is slow, low heat…so the BBQ unit you use makes a big difference sometimes. Too much heat cooks the butts too quickly, not enough, and you won’t get to the final product you want. I was very confident in the Egg – it’s a champ.

Rubbing My Meat

The fun part of making this, to me, is creating the dry rub. You can go easy, using some premixed stuff (lots of them are decent), but I like to make them from scratch every time, so they are always different. I blend whatever is around, and I had LOTS to play with. There were over 40 spices in here – garlic, onion powder, cumin, celery seed, basil, rosemary, thyme, peppercorns, allspice, chili, brown sugar…you name it, I most likely put it in there. I could never tell you what I did exactly in making my dry rubs, but they are always fun, and usually delicious. I don’t think you can make a mistake, but a lot of garlic, onion powder and cumin are common base layers.

Before I apply it, I pat down the butts with paper towels to dry them, then I rub them down with plain yellow mustard. Trials have taught me that the mustard does a couple good things – it is a binder that allows your dry rub to stay on the butt, it is a small extra flavor layer, and it is also some moisture. I can’t remember where I learned that one, but it is a great, simple trick and I prefer it with the mustard rubdown.

In the bottom picture, you can see the bowl of dry spice I made – I used all of it. I cover the butt completely, and keep track of which side has the fat layer I mentioned earlier. I put the seasoned butts with the fat layer up – this is how I put them on the grill, too…it actually does matter a bit, which I’ll explain later.


butts coated in mustard
dry rubbed pork butts
The Big Green Egg

Hurry Up and Wait

So by this point, all the heavy lifting is essentially done. Once the coals were burning well, I put the butts in the Egg. It actually took me a couple tries to get the lid closed: there was no more room at the Inn, that was for sure. But I knew that once the lid was closed, it would stay that way until the cook was done. 

It’s not that you can’t open the grill during the cook, but each time you do, the temperature changes – much like an oven. In the Egg, opening it makes it burn a lot hotter as well, so I wasn’t going to open it again until it was done. I put the butts on the grill at 9 pm, and cracked the first of many cheap beers I would drink all night…another tradition of mine. 🙂

I stayed up all night, checking hourly that my temp stayed where it belonged. This Egg cooks a little hot, but I had 32 pounds of meat on it, so knew it’d be fine. I maintained about 230-240F all night long, playing guitar and drinking cheap beer. I saw the sunrise, and enjoyed the smells that filled the air.

fully cooked pork butts

Thirty Pounds Worth!

I believe I took that pic above, the one time I opened it…after about 7 hours. 7 hours is a normal time I would cook a single, smaller butt – but I knew I needed to allow these to go much longer. I ended up letting them go 14 hours – the temp was just starting to drop then, so I knew the fuel needed some kind of tending if I wanted more. 14 hours was plenty – almost bordering on too much time. I was pretty confident they’d be great, though.

The reason I put the butts with the fat layer up, is that as the butt cooks, the fat melts down and drips through the meat. I have done it with the fat on the bottom, and it can cause flare-ups and you simply lose all that great flavor. Find the fat layer, and keep it on top-you don’t flip a pork butt during cooking.

I had to use a big spatula to finally pry them from the grilltop at 11 am the following morning, but they felt all gelatinous and wonderful.  They held their shape, but were super tender, I could tell. Smelled like absolute heaven to me.

The Crucial Step: Wrap and Rest

The next step, is a critical one in making awesome pulled pork: the wrap and rest. All of that time on the grill makes the meat stressed, so you want it to rest before you shred it. The way I do it, is to wrap them first in tinfoil and then plastic wrap. I make sure they are completely sealed, then I put them in an Igloo cooler. Normally, I rest a butt for about an hour after the cook, but the longer it can go the better it becomes.

What happens when you rest the butts like this, is they achieve their moistness and finished texture. I have skipped this step and it is a big mistake – the butt will be dry and disappointing. All of the fat will drip from the meat and leave you with dried out garbage…The cooler helps retain the heat; the butts continue cooking when they’re wrapped, but much slower and without directly fueled heat.

I wasn’t intending to, but these butts ended up staying wrapped for almost a full day. I never once opened the cooler, and think this helped them turn out as good as they did. When I did go to work on them the next morning, there was still residual heat in the cooler, like steam. That made me happy. And hungry! 

pork bone out

Pulling My Meat

So all that was left here, was to shred the pork, or “pull” it. The bones slipped out of them like nothing, and I had a great bark/smoke ring on all three. I used gloved hands and a couple forks, and in about an hour it was all good. I wrapped it, and was ready to bring it to the reunion in an hour…everything worked out swell. I snacked on it, and was VERY pleased – the flavor was exactly what I wanted.

shredded pork butt

Happy Ending

And there it was. I was VERY happy with my end result – it was moist and super flavorful. I went for 14 hours on the cook which was a very long time (smaller pork butts tend to need about 6-8 hours), but it was cool because my temp stayed constant. I managed air flow all night long (thank you cheap beer), but ended up with something pretty special.

I think my end result was improved because of who I was cooking for: my classmates in Florida are great folks, so I put a lot of love into it. I heard some amazing compliments on them, and folks told me it was the best pulled pork they ever had – they came and found me a couple times, to ask how I did it. Later, I saw people taking it home which made me very happy indeed. It was one of my better ones for sure, and the fact that I cooked 32 pounds made me smile.

If you wanna do some pulled pork, here’s what to think about:

  • The size of the Boston Butts (bone-in) you buy, determine cook time. 
  • Have a cooking unit that allows multiple hours of low-heat smoking…ovens and gas options can work, but charcoal is infinitely better. Pellets are great as well, but a different way of cooking.
  • Mustard rub the butts before applying generous amounts of dry rub. Let it marinate a while if you have time.
  • Leave the lid closed…peeking only messes up the temperatures. 
  • Wrap the cooked butts, and allow them to rest. Make your wraps airtight-this makes the meat moist.
  • Don’t sauce anything. Sauce is served on the side – as should be, dill pickle chips and white bread. Classic!
  • LOW and SLOW. Don’t rush anything – the longer you wait in most BBQ situations, the better. You MUST keep the temps under 300F – the lower you can go, and keep steady, the better your finshed product.

Go Greenies! I may have only attended one year of school there, but I made friends that last and support a lifetime.

Delicious!!


Recipe for Vegan Black Beans in a Clay Cooker

Recipe for Vegan Black Beans in a Clay Cooker

I wanted to make black beans from scratch – and not from cans, either. Canned black beans are soft and gooey off the shelf – I wanted to have firmer beans that got their glorious goo from things I did on purpose – something much more detailed and elaborate than simply opening a can.

I decided to make them vegan this time too, as I figured it would come in handy to know how to do that. I know a LOT of nice Vegans that I might share a good dinner with, occasionally – I needed another ace up my sleeve for them. So here you go, Vegans – go grab your clay cooker.

new clay cooker
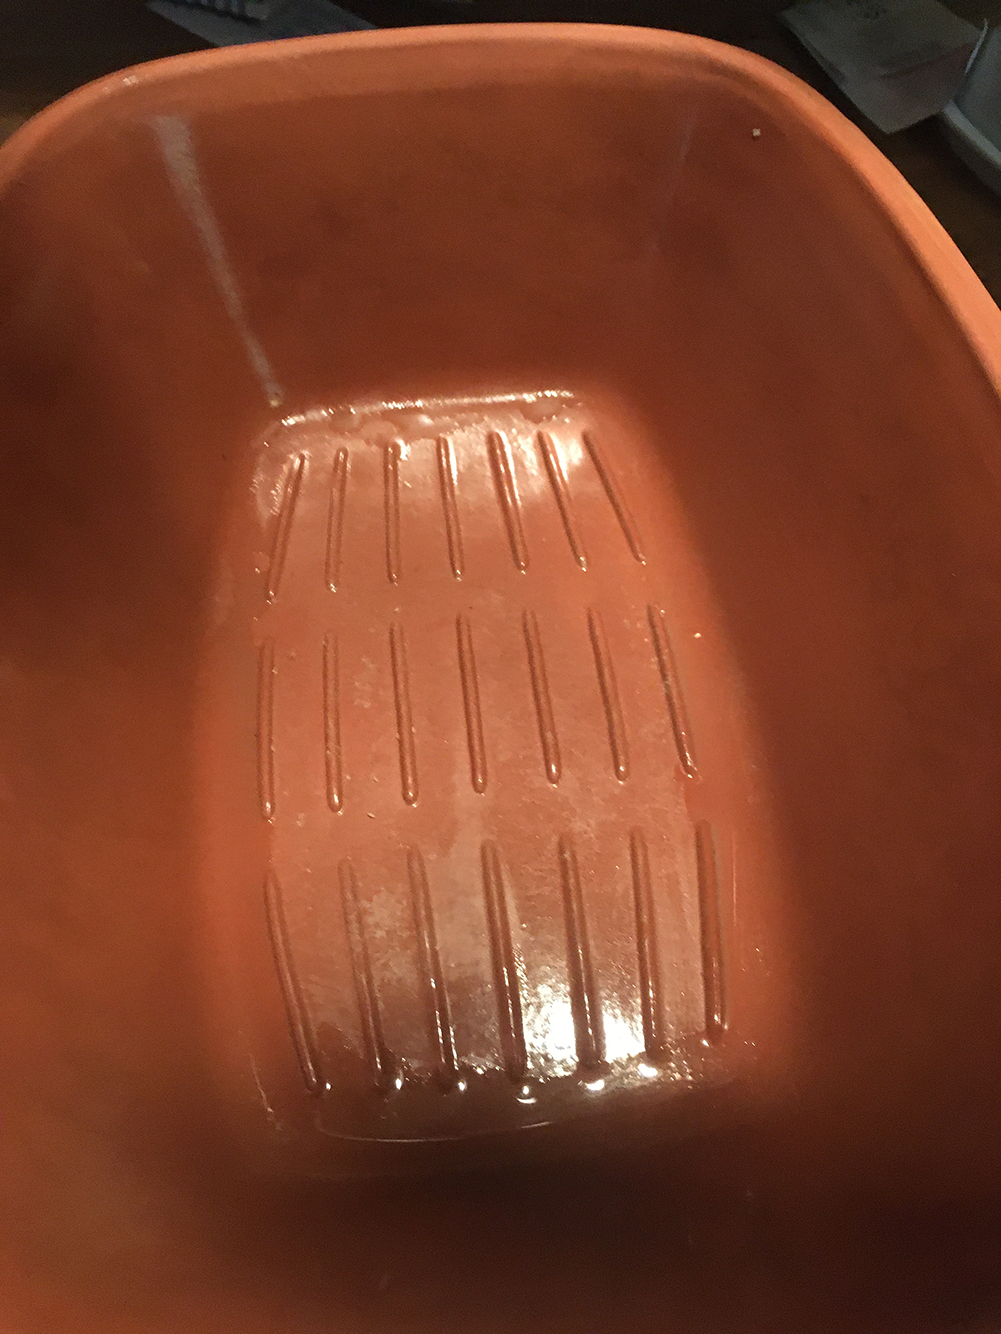
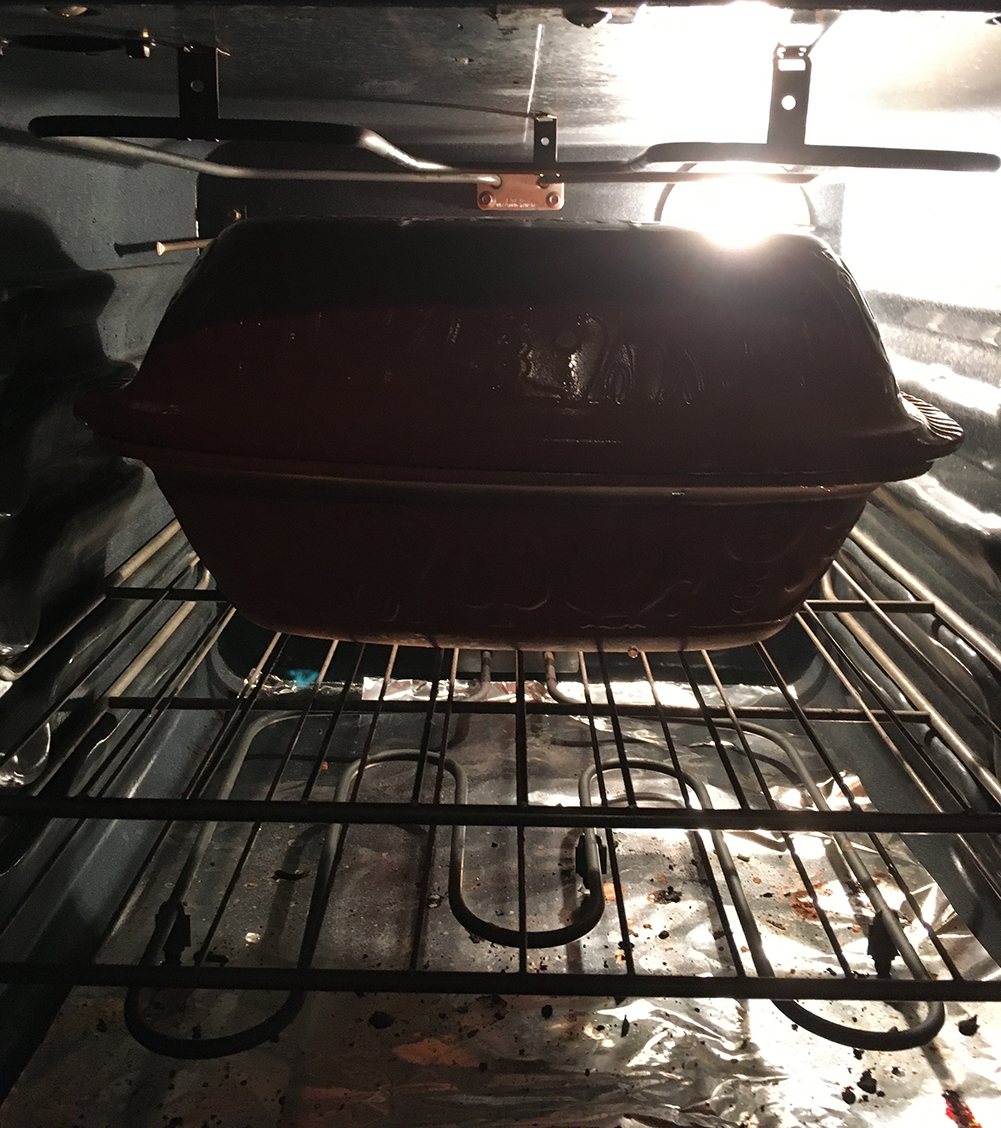
I was also using this outing to experiment with more things in my new clay cooker. I had a great little Romertopf forever, but then brought it to a dinner party a couple years ago and never got it back. Lucky for me, I found one at a junk store last month for $20, brand-spanking-new – it is a little larger than my last one, and has a glazed interior, which were both cool perks.

These vegan beans were one of the first couple things I cooked in it, after some delicious chicken and pork dinners were nailed righteously.

Note that this recipe is meant to spread-out over a couple days – it takes a long time to make dry beans into eatable beans. More time still, to make them delicious! It is totally worth it though, and it is not a lot of time prepping as much as simply a long time to cook. I tend to find this pretty therapeutic, but I am admittedly and unashamedly a weirdo.

Soak Your Beans – 12 Hours at Least – and Your Cooker

black beans to soak
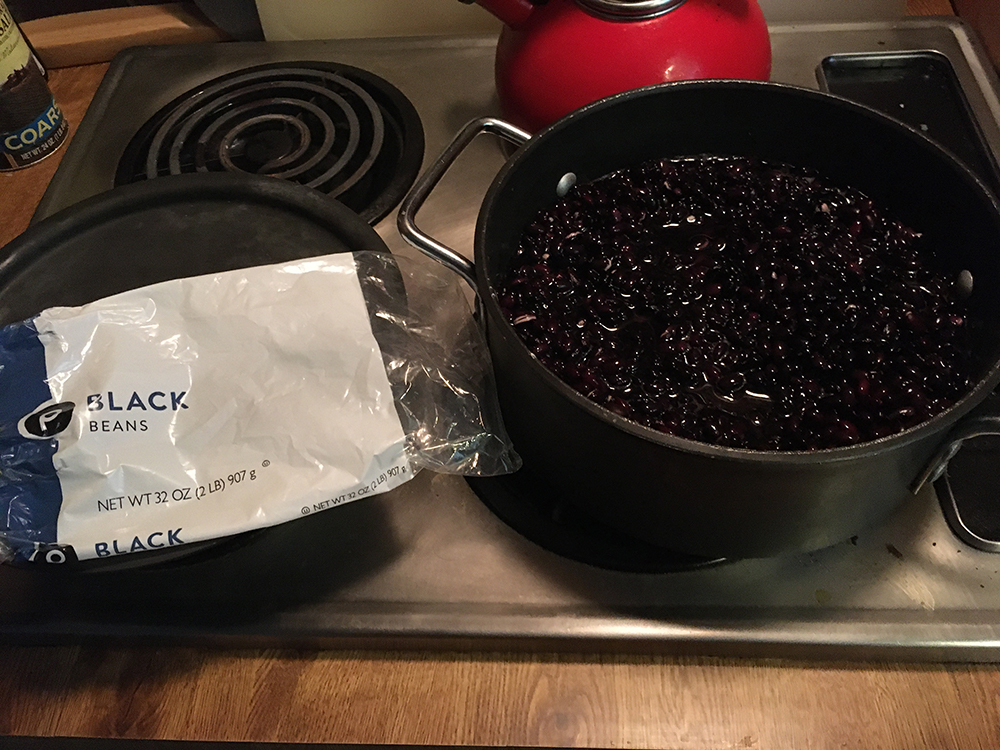
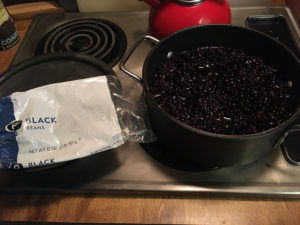
So in typical black bean fashion, I started with a bag of generic  dry black beans – 32 oz.  I submerged them in a lidded pan full of warm water, about 4 quarts worth, and let them sit, covered, for a total of about 24 hours.

rinse black beans

Note that they will increase in size (about double) once they soak up that water – -so ensure you have enough fluid there to soak-up…I have often used too little, and the beans simply soak it up too quickly and won’t fully soften. Err on the side of having too much than otherwise – you can’t really have too much water, but you can certainly have too little.

I have also tried pre-soaking in broth for adding flavor a couple times, but didn’t notice enough impact to do it again – water works just fine.

soak lid
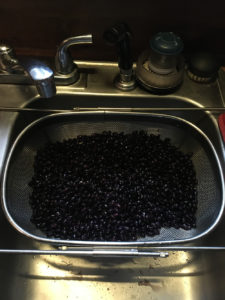
After they have properly soaked (minimum time would be overnight), I rinse them well, and set them aside for a while to prep the veggies. Rinsing only helps get the gunk off them – look for stones too, which I actually see in there pretty often. The beans will be pretty uniformly the same when they are soaked well.

When you are ready to actually make the beans, as with any time you use the cooker, you want to soak the lid (at least – you can soak both sides of the cooker if you’d like)…this will create steam, and helps preserve the moisture of anything you cook.

I try to let it soak for about an hour while I am prepping other stuff, but not sure what the manufacturer would suggest. An hour has done fine for me for years.

Chop Your Veggies

veggies for vegan black beansWhen I make black beans, I make them the way I learned in the Jamaican restaurant I worked in during the late 80s/early 90s – because they did them so wonderfully. It is a kind of “kitchen sink” approach to it – you throw in anything you got, and know you are generally only going to make them better if you have more stuff in there and cook them down long enough.

An important break from my norm here, was doing this totally vegan. I typically would put some pork bits in there, like salt pork or bacon or fatback, to cook down a little fat and make the beans more succulent – but that would not make the Vegans smile, so not this time. Understand though, you can definitely add some pork bits in right here, and that would not hurt the beans at all if you aren’t preoccupied pleasing Vegans. It might add to the time you cook everything, but it is well worth it.

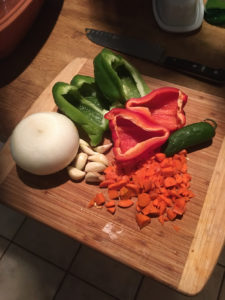
For these beans, I went with what I had on-hand – a couple bell peppers, a kind of sad and wrinkled jalapeño (with all seeds intact for some heat), onion, garlic, and carrots. Carrots were kind of a weird thing, but I figured if cut small enough they would simply add a little body and flavor to the base of it all. It is a trick I learned with marinara sauce – if you add carrots to a tomato sauce, it can be lovely. Same theory here.

veggies in clay cooker

Cutting these veggies really small was also something I did on purpose, because of the way the clay cooker works. I knew that if I cut them really small and put them under the beans, they would essentially melt down for me, and help create a luscious layer of flavor. They would be bathing in broth, and all would be right with the world.

I knew that I would never see these veggies again, and I was OK with that. If I wanted them to remain in the mix, I could have used a larger cut so it didn’t melt down in the heat and juice…it depends what you want your finished beans to be like.

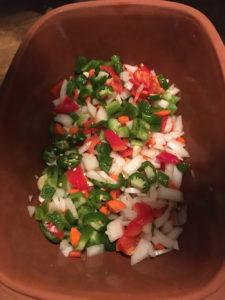
So understand that while I used the vegetables that I used this time, you can use whatever you got hanging around. Onions, peppers and garlic would seem pretty necessary to me, and from there, you can wing it. Empty the fridge…I can’t think of anything that would hurt you here, while some choices (like corn, or artichokes) might just be a little weird. In the Jamaican place, we threw a ton of stuff in there while they cooked so go nuts if you like.

One cool thing about using the clay cooker for these, is knowing my veggies will cook off nicely under all the beans – I have tested this theory before, in layering the clay cooker different ways. If I were using a kettle on the stovetop, the vegetables would not render down the same way, and would tend to hold more of their original shape/texture unless I rendered them down…it takes much longer and a different cooking manner for the same effect to occur.

Once I put the small-chopped veggies in the cooker, I put the rinsed (and now air-dry) beans on top of them. And then the fun part could finally begin – the seasoning!

Spice It Up!!!

dry spices for vegan black beansIn much the same manner as emptying your fridge to build an interesting undertone, the spices you use for your beans are going to become the true stars of the show.

Beans by themselves, even with the help of some nice aromatic vegetables, are bland as can be. Dry spices and fresh herbs bring the right dimensions to your efforts. You will be rewarded handsomely for taking your time on this step of the process.

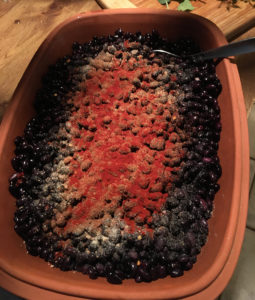
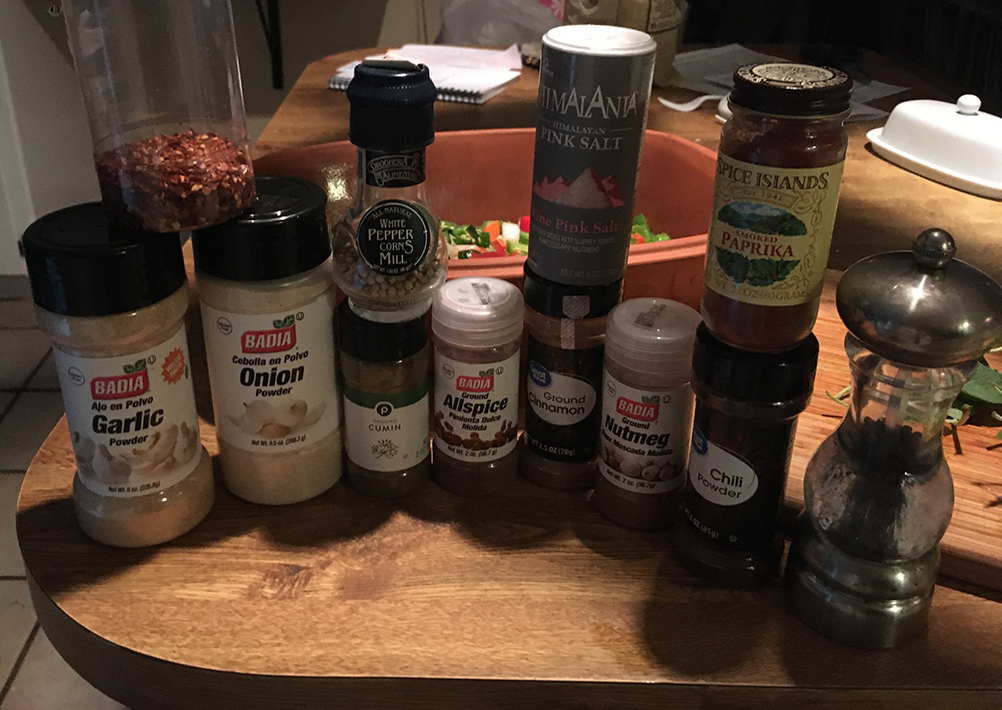
I don’t hesitate to go right in there, and get it all going when I am doing beans – there is not much that is off-limits. The staples, would be healthy doses of garlic and onion powder for added strength (we have them chopped, too, remember), cumin, allspice, crushed red pepper, chili powder, rosemary, basil and oregano. I personally like adding a combo of cinnamon, nutmeg and ginger root too, as they blend in this wonderfully Mediterranean kind of way.

spiced black beansI don’t stop there though, and will grab thyme, coriander, marjoram, bay leaves…anything and everything might get thrown in for good measure.

Salt and pepper too (white pepper is excellent in these), but I tend to go light with additional salt (blood pressure reasons)…people can always add that later, if they like, but it should be far from necessary to get salty in here if you properly go to town with this spice-it-up step. A lot of dry spices and fresh herbs will pop right through the beans, and layer them with all the flavors and complexities you are looking for.

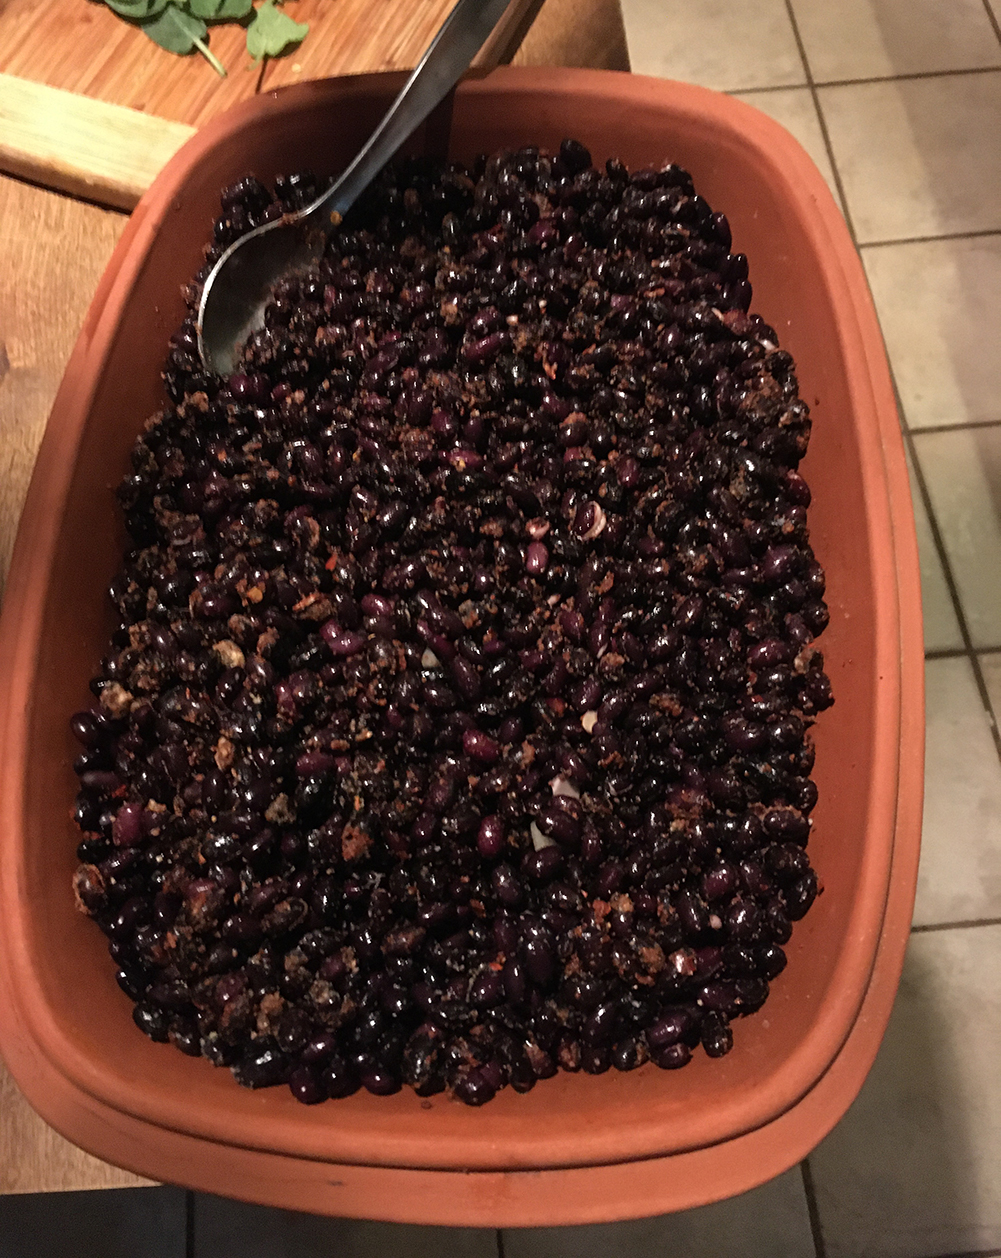
What I did here, was to add all the spices to the beans, then I very carefully stirred them so as to not disturb the veggie layer underneath. In retrospect, I should have probably mixed the dry spices in a bowl, added the beans to properly coat them, then put the fully-seasoned beans on top of the veggies. oops – not this time.

stirred and seasoned black beansIt did not matter – in much the same way, it does not matter what you do for your spices as long as you understand to be happy and liberal with them. If you have a lot of fresh stuff on hand, even better – I didn’t, so went with the stuff I did have and knew they’d be wonderful.

sage and oregano
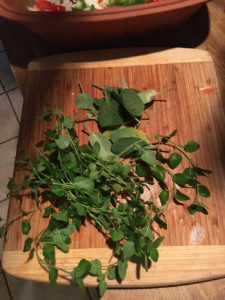
Once I had the dry spices mixed in the beans, I went to the herb garden and pulled some oregano and sage – they were again, the ones that were there, so they were nominated. Rosemary, fresh, is perfect for beans – basil works well too, as will cilantro, tarragon and most things your herb garden might have.

chopped herbs for black beans
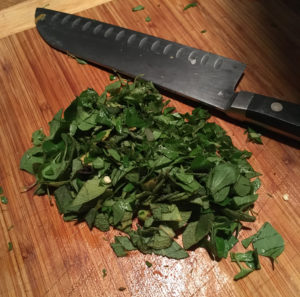
For these, I dry-spiced and mixed the beans, then I added 2 boxes of vegetable broth.  I chopped my fresh herbs and put them on top of the finished beans – they were intentionally last, much the same way the veggie layer was first. Why? To take full advantage of the way the clay cooker works.

The 2 boxes of veggie broth did not come up over the top of the beans (more about this later) but came up about a half-inch or maybe a bit more than that from the top.

seasoned vegan black beansWhen I put the chopped herbs on the beans I knew they would stay there – that the heat and steam in the cooker would activate them wonderfully, and behave differently than if I were to stir the fresh herbs into the beans. I wanted the fresh herbs to steam and dry out, but stay more or less intact – so a specific placement in the cooker, was key.

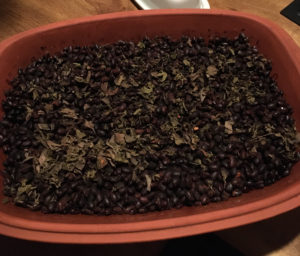
Once there was a healthy bit of dry spice on the beans and the broth was under there, as well as a nice layer of veggies on the bottom and aromatic fresh herbs on top, and the cooker top was soaking the whole time I was prepping this stuff, this was ready to go in the oven.

Crucial Cooking Times

soaked clay cookerI tend to find in clay cooking, there are two general ways to go – either low and slow, or hot and quick. Both methods have their benefits and limitations, depending on what you are cooking.  Beans like this, without any meat or grease in them, should probably be somewhere in the middle of that.

I put mine in the oven at 325 – and let it cook for four hours. I was thinking a low, slower heat would be the thing here, but I can admit freely, I was a little off in my calculation.

My first mistake, was not adding enough broth or liquid to them. I put in 2 boxes of broth, but I had a LOT of beans here, so I needed more. I could’ve easily added water – or beer, or more veggie broth. You want to bring the liquid level up to the beans – I don’t think you need to submerge them completely, but you do want them to be moist all the way up.

in the oven clay cookerWhat happened with mine, was in the time they cooked, the broth got sucked up into the beans – so there was not originally a lot of that “glorious goo” I mentioned at the beginning of this. Ooops. The flavor was still amazing, and the beans had a great consistency to them – but I wanted them still a little softer, which I could’ve had with more liquid, and maybe playing with the heat some and making it hotter in there.

One thing to do with the clay cooker sometimes, is start it out hot and then lower the temp. You might go after 450 to get things started, and after an hour or two, drop that down 50 or 100 degrees. What that does, is it creates the steam/boiling heat you want, then you mellow it out for a longer period of time…but the clay holds a ton of residual heat that cooks stuff really evenly.

It is very hard to make a mistake that you don’t want to eat anyway, when you are using the clay cooker. I didn’t think of these as a mistake by any means, but just thought I could have done one step better. I like the learning curve here – not hard to take. 

cooked beansWhen I took the beans out, the herbs on top were dried and fragrant – so I stirred them into the mix. I pulled up the veggies too, or whatever was left of them really…they behaved perfectly and were simply part of the beans now.

done black beansUnlike a can of beans, these had all retained their body – they smelled incredible too, with all those spices and herbs just dancing around the kitchen.

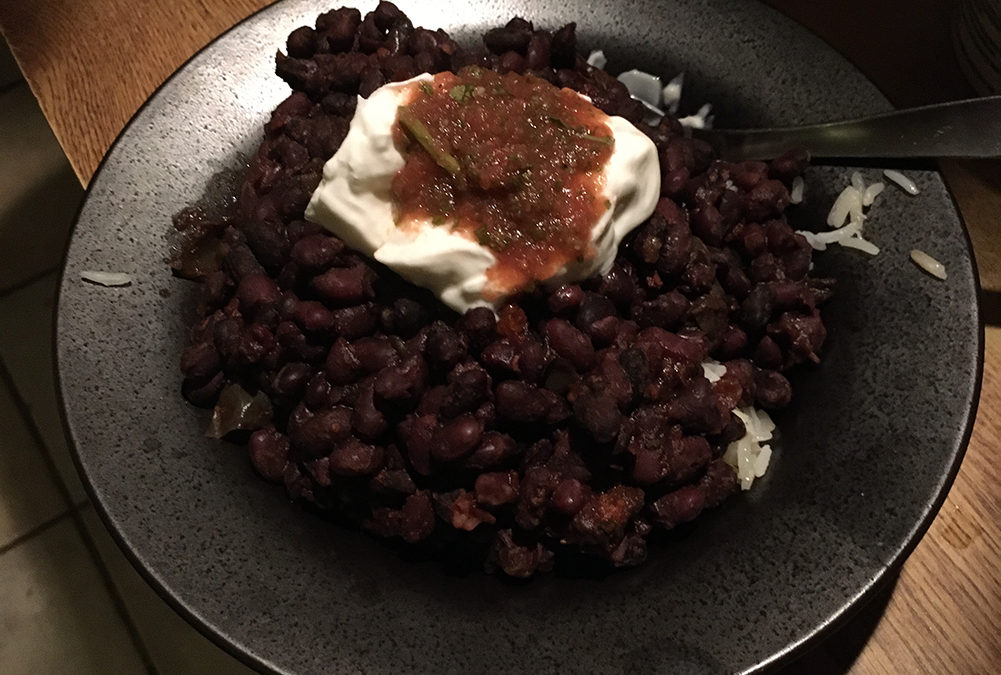
I ate a bowl of them immediately (over white, Basmati rice), and then I added some warm water and a room temperature beer, and threw them back in the oven for another two hours at 450 this time, to get them boiling.

When I pulled them out after the extra time, they were PERFECT – they had the right tenderness to them, and there was a delicious kind of sauce that was simply residual stuff from the long cooking time and extra fluid. 

vegan black beans from a clay cooker
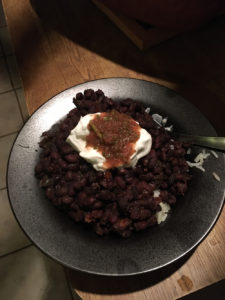
I broke my rules too, and had to top this off with sour cream and salsa – sour cream may not be vegan, but it is a great add to black beans. I might even go as far as mandatory, but like I said before, I am pretty weird. Vegans might substitute something else here, but I wanted the dairy and I did lay off the salt pork, so felt vindicated. I was alone anyway, so no harm, no foul.

And That’s That

So that was it here – I made a ton of these things, as you can see. I ate them every day for 4 days in a row, then I froze a big bag of them to have later.

Next time, I am gonna go back to adding some salt pork to it – I just prefer them to have some meatiness in there. But these were in no way lacking – they had flavor for miles, and a texture that is hard to get outside of a restaurant that does these for days at each cook, like we did at the Jamaican place. The beans there would cook for 2 full days before they were served – I cut it down to a few hours here. Know that if you add more time to them, they break down more (like refried beans) and get ever more soft and delicious.

As always, if you have questions fire away – and if you have any tips or tricks to share, please do so!

Bon appetit to you all!

Harness Lead – a Truly GREAT Product

Four Times Tested, Four Times a Champion!

I don’t tend to go public with thoughts about specific products, but this is an exception.  Not afraid to say it: I just LOVE the Harness Lead, and have had 4 dogs to test it with, and every test was aced!

I figured a good way to share my experiences is to tell the stories of the dogs who benefited.

Zoey

Zoey Lamers

My beloved old girl Zoey was almost 11 years old when we found her a Harness Lead. She was at least 70 pounds of almost solid chest muscle, so when Zoey decided she was going to go somewhere, she pretty much did as she pleased and you might easily get dragged along with her. While gentle as can be, she was also very headstrong, and powerful.

Over the years with Zoey, I had tried all kinds of collars, leads and restraints to make her behave – all with varying, but limited success rates. I hated to choke, shock or inflict any kind of pain on her to make her obey. It seemed cruel and unnecessary, but I didn’t know what else to do. Then we got her a Harness Lead.

Putting it on her was easy – she stood still while I quickly wrapped her with the Harness Lead. I immediately noticed the difference in the way it reacted to her movements, and she to it…she didn’t pull on it, as she would to a choke collar or other neck-based restraint. I liked the softness of the materials, and the gentle way it treated her. She heeled as soon as I took out the slack, and seemed happy to do so.

After our first few walks, the Harness Lead itself, became the call to going outside: “You wanna go out on your new lead?” I asked.  She knew what that meant, or what it meant when I simply picked it off the wall hook, and would stand still, eagerly wagging her tail as I wrapped her quickly. And as I finished, she would be at attention, happy and waiting to walk, but not jumping around or barking or being hyper like old leads would suggest to her. There was a new discipline that the Harness Lead itself produced when it was on, and I LOVED it.

I have since thought that it is the nature of the lead that makes the dog feel comforted – the slight pressure on the chest, wraps them like a security blanket or something. At least that is the way Zoey behaved on our walks using it. To say it was a game-changer, perhaps is even underselling it somewhat – it was just awesome, especially in comparison to others I had used.

HarnessLead on Zoey LamersMy one regret with Zoey’s Harness Lead, is that she only had it in the last few months of her life. She was older, but still quite a handful to take for a walk, until we used the HarnessLead. As soon as it was on her, she would heel calmly, and be ready to go wherever our walks would take us.  She did so until she couldn’t go on walks any longer.

I appreciated the fact that I wasn’t choking or pinching her anymore to make her behave – the lead seemed to encourage her to do it all on her own. She was always happy to go on a walk, but she seemed even happier once it meant that the Harness Lead was the choice of restraint.

I miss Zoey every day now, and though I buried her with many of her favorite things, I kept out the HarnessLead she loved so much so my next dog can enjoy it as well. I have it in a handy place now, ready to be brought back into action when the time is right. It may still be hard to think about having another dog just yet, but it is easy to think about what kind of lead my next dog will be using from day one.

Bumba and Ganja

harnessleads on huskies

These beautiful Husky-mutt-mixes were mother and son, visiting from Colorado for a few weeks. At home, they claimed more than 400 acres of territory to roam without a lead, but the rules and expectations were much different here in suburban Atlanta. It was going to be a challenge, particularly for Ganja, the male pup, who was just over a year old, and had never even been on a lead. “He’s essentially like a really sweet wild animal,” his owner confided in me.

We need to obey the  Georgia leash laws and wanted to take the dogs on hikes and into city settings, so a couple Harness Leads came in the mail, just as quick as they could get here.  The results, were very impressive, indeed.

Bumba, the mother of the pair, was a quick learner and was immediately able to go on long walks without pulling, straining or yanking on her lead. Though a lead (of any type) was clearly something she was not fond of in any sense, the Harness Lead was not a problem for her, and she behaved like a champ every time we used it for her. Yet the real eye opener, was how her boy Ganja reacted.

the Harness Leads ArriveOn his very first walk, it took Ganja only minutes to understand how the Harness Lead worked, and he was heeling, and behaving in a manner unexpected but totally appreciated by us humans walking him. Instead of tearing around full of puppy zip and being hard to manage, he was attentive, happy and perfectly content to do as we wanted.

Within a couple days, it was noticed by us both, that simply putting the lead on Ganja had this calming effect: though still a puppy in every sense of the word, he behaved much better instantly when he was on his lead.

While the dogs still much preferred to be loose and behaving like “wild animals,” the Harness Lead enabled us to bring them into new settings and into some better hiking opportunities. Best of all, was the rambunctious puppy calmed as soon as he was in the Harness Lead – which made every walk more fun for all.

When the visit was over, the dogs carried with them their new Harness Leads, so that they could encounter more opportunities wherever they happened to travel next. Leash laws were no match for these lovely mountain mutts!

Bella

Bella on the HarnessLeadMy son and his girlfriend have a fiesty little pit bull named Isabella, or Bella for short. A lovable runt who has always been a city dog, she struggled to get a lead that did not irritate her sensitive skin. She also seemed oblivious to some collars, and would choke herself silly on every walk. While some body-harnesses worked better to control her and prevent the constant pulling, the velcro straps would chafe, and the poor thing had body rashes and skin irritations all the time.

That is, until she got her Harness Lead from Grandpa.

When I was caring for her recently, I decided to try the reliable Harness Lead, to see if she behaved and reacted better to it than to a regular choke collar or even the preferred body harness we used on our daily walks. And as with all the dogs I had seen before her, Bella behaved like a champ on the Harness Lead.

Her tendency to pull and strain on the lead was not there – unlike when she was using a more traditional lead. Better still, the soft material and the way it is made, did not irritate her very sensitive skin: no more chafing from a walk. This was wonderful news for her continued recovery at my house, and when she moved home to Brooklyn soon after that, she brought her new lead with her to show-off to all the dogs in the city.

Go Get Your Own

In no way was this post a paid endorsement, or anything similar. I am sharing my personal experiences with a tremendous product – an innovative lead that I would not hesitate to recommend to any dog owner. They are gentle, strong, sensitive and effective leads which make some dogs respond in a calming way almost immediately when they get into them. I have seen it, more than once on very different dogs.

To get your own, simply visit the website: https://www.harnesslead.com/. There’s a shop option there to ship right to your door: https://www.harnesslead.com/store/c1/Featured_Products.html and if you have any questions, you can email them at harnesslead@aol.com. Your pup will be very pleased with you!

Want some more dog harness reviews? Check out this site: https://www.rescuedogs.co.uk/harnesses/

Same post, different day

I found a post on my other site I did, back in 2013 – seems pretty much on point, so I am re-sharing it.Enjoy, or send your distaste to me in a special package I can ignore in all kinds of fascinating ways.

Saturday, August 31, 2013

Been too, too long…
But this lil’ ol’ blog is still here. Just like the ongoing work as an SEO copywriter, if you are looking for it. Clients are still there, but the effect of SEO copywriting is perhaps a little more strange than it was in the past – a bit more uncertain. I don’t think this has anything to do with the crafting of solid SEO copywriting, more that Google has shifted gears a ton in the past year, so what they are doing is kind of trumping what anyone does in a page.Hear that correctly now, ’cause I am not saying SEO copywriting is any less valuable to SEO than it ever was, or ever will be. Google hates SEOs though, so the extra descriptor on the act of writing something may see some editing. Who knows. Schlemeezle, schlemazzle.

Organic results are disappearing though, intentionally if you are paying attention, and sites are getting penalized more than they ever did before.The combination leaves fewer sites dominating the shrinking available organic space, and with these shifts come wider steps away from the minute, independent nature that drove the web’s information to where it is. Big business took over, so to see it in any lesser way is to be naiive and to launch yourself toward #epicfail.

I am proud to be an SEO, especially as it gets harder to do. Got more for me to consider with each effort? Good – bring it on…I’ll accept that challenge, as I always have.
But Google does not like SEOs and never has…despite the smiles and promises, no matter what they tell or told you. The very nature of SEO work is something beyond Google’s control, so Google allows less and less of it to matter.
Unfortunately, it is taking with it a lot of what made the web and Google a fun place to be for so many years: the promise of relevant depth and variety. Independent publishers are having a much harder time surviving as Google takes small measure after small measure to restrict any Google-is-not-in-the-middle-of-it activity or information from being available.
They are a business, and can do and display what they want – but we all suffer, because they have such a dominant blanket over sorting and displaying the world’s information, and they are scrubbing and tilting it toward their own agenda, not everyones. They have alternatives, we don’t – and yet their decisions will affect just about everyone, whether or not they are aware of it.
And that is really just a shame, because it could have been better.

I am not as despondent as this sounds – far from it, in fact. I still love the gig, still sliding down the dinosaur at night with a big smile…even bigger than it has been in years past for sure, too. I just can’t help but be rather trepidatious at the idea of things getting better in regards to how queries are answered with relevant, and diverse results in the world’s biggest search engine.

Google may hate SEOs, but I don’t hate them back…I simply don’t trust them at all because they have a very solid track record of serving themselves while saying it is otherwise. The past year has seen this in the most dramatic, and disappointing changes I have ever seen in the results displays -increasingly less space, filled with more and more Google properties every month. And more and more of a distance from what I used them for to begin with – they simply fail to grasp I am not shopping every time I am online, actually the opposite is very true for me. That disconnect has me moving away from a search engine whose results used to be on-point and fun to explore – now they have become a chore of endless ads and incorrect answers to be sorted and sidestepped. God forbid I accidentally click on the wrong thing in there.
In using a blanket and hammer when penalizing optimized sites, Google is now pretty dramatically suffocating its (our) information…because so many site histories had a skeleton or two in a closet that was actually already painted over.
Discounting these over-zealous efforts is the logical move, but penalizing them has made it a different world – and those who can’t figure it out fast enough are scrambling to Google to pay for traffic they used to get for free, and this is the point, isn’t it?

Like I said before, this has nothing much to do with any specific kind or direction of SEO copywriting, but more a little look at what may be in store as efforts continue to diminish the value of an SEO because the “o” means optimizing organic, and without organic, there may be dawning a brand new way to look at what we do…because as they go, so too goes a really huge and unforgiving part of the trade.

So I use this as a call to action: if there are going to be less spots that are harder to get, the true value of SEO copywriting is really just beginning to get reshaped and redefined by the market demands and rewards, again, as it has before. Always. I am not going to hang up my SEO roots, not now nor ever. I am very proud of what I do, and I don’t take it lightly. Google doesn’t have to like it – they never have.
As my fave basher Nick Lowe would say, “And So It Goes.” 🙂

Back to work…